Video and Sound Production - Lectures and Exercises

Tan Zhao Yi / 0363285
Video and Sound Production / Bachelor of Design (Honours) in Creative Media
Lectures and Exercises
- Idea development
- Story
- Storyboard
- Visual References
- Location/ Props
- Lighting
- Costume
- Principal Shooting
- Offline Editing
- Online Editing
- Audio Editing
- Motion picture/Film/Video is made up of many shots.
- Each shot requires placing the camera in the best position for that particular moment in the narrative.
- Shot is continuous view shot by one camera without interruption.
-
Sequence is a series of scenes, or shots, complete in itself.
-
Scene defines the place or setting where the action is laid.
- A scene may consist of series of shots or sequences depicting a continuous event.

- Turns the story to new direction
- Sets up Act 2
- Raises the stakes
- Protagonist's quest reaches critical mass
- Possible solution is presented
- Biggest cliffhanger: will the protagonist win or lose?
- Introduces the world, main characters, and establish the dramatic situation
- Leads to plot point 1
- Develop complication
- Leads to climax (plot point 2)
- Ending of climax
- Answer to all obstacles
- Speech: One of the most important tools for understanding the story of the film.
- Dialogue: Conversation between characters in movie.
- Voice Over: The voice of an unseen narrator speaking.
- Sound Effect
- Ambience: Audio refers to the background noise present at a given scene or a location.
- Hard or "cut" effects: Almost every sound we hear at the movies that isn't dialogue or music is a sound effect.
-
Music: to enhance the dramatic narrative and the emotional impact.
- composition, set design, lighting, costumes, depth of space, meanings etc. that appears on the screen
Lecture 5: Color Correction
Colour Correction: The process of adjusting each clip in a video to ensure a consistent look. It involves making whites appear truly white, blacks genuinely black, and maintaining even colour balance throughout.
- RGB:
- A colour model where red, green, and blue light are combined in different ways to create a wide range of colours.
- Sensing, representation, and display of images in electronic systems.
Tutorials
1. Select Colour Panel.
2. Select Lumetri scope: RGB Parade, Waveform, Vectorscope.
3. Decide
Luminosity Value.
4. See only highlight, midtone,
shadow:
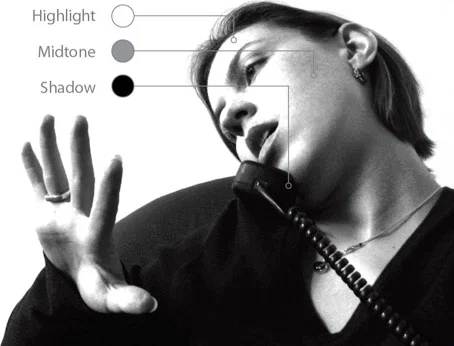
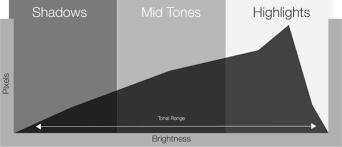
5. Adjust Basic Correction: Exposure, Highlight, Shadow
6. Right click and select Display Mode → Comparison View
to see Before & After
7. Refer to waveform during
adjustment.
8. Use the 1st adjusted clip as reference to
work on the rest.
Colour Grading: Enhances visuals for storytelling. After ensuring a natural look, you can use it to establish a new visual tone, increasing contrast, saturation, and adding new colours.
Tutorials
1. S curve
adjustment: increase contrast
2. Adjust Temperature, Tint, Saturation
3.
Apply complimentary colours (two colours): Teal & Orange
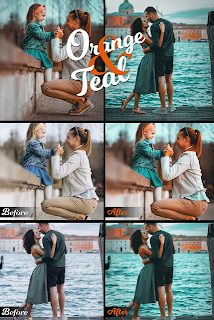
4. Colour wheels: Shadow to teal, Highlight and Midtone to Orange.
Lecture 6: Audio Editing - Sound Shaping with EQ
Frequency Range: Hertz (Hz)
Human hearing: 20Hz ~ 20000Hz

Dynamic Range: Decibels (dB): The threshold of human hearing is measured as 0dB SPL (sound pressure level) and the threshold of pain 130dB SPL.

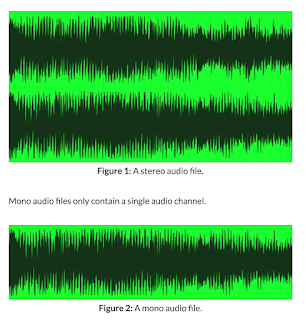
Space
Mono sounds: recorded using single audio channel
Stereo sounds: recorded using two audio channels
Phone Call Sound Effects
1. Create Multitrack session, name and save it.
2. Effect rack → Filter & EQ → Parametric Equaliser
3. Bring down bass, treble, raise mid range betweenc500Hz to 2kHz.
Muffled Sound Effects (wrapping by something)
1. Create new multitrack and apply Parametric Equaliser.
2. Remain bass, treble to the bottom, raise mid range to top.
1. Create new multitrack and apply Parametric Equaliser
- Decay Time: Specifies how many milliseconds the reverb takes to decay 60 dB. Longer values give longer reverb tails.
- Pre‑Delay Time: Specifies how many milliseconds reverb takes to build to its maximum amplitude.
- Perception:Simulates irregularities in the environment
- Dry: To add subtle spaciousness, set the Dry percentage higher; to achieve a special effect, set the Dry percentage lower.
- Wet: To add subtle spaciousness to a track, keep the Wet percentage lower than the Dry percentage.
- Prepare storyboard.
- Clock every shot.
- Start collecting sound clips.
- Prepare material and build puppets and background
- Set camera on tripod.
- Use manual exposure and focus.
- Shoot during the day but use manual lighting.
- Shooting Stop motion with DSLR
- Select jpeg L/Fine
- Resolution: 5K-6K
- DSLR photo default aspect ratio: 3:2. Change it to 16:9.
- Shooting Stop motion with Phone
- Use app to export video for editing

|
| Fig 1.1. Mints Video Clip |

|
| Fig 1.2. Arranging Mints Video Clips |

|
| Fig 1.3. Doritos Video Clip |

|
| Fig 1.4. Arranging Doritos Video Clips |

|
| Fig 2.1. Footages |
Final LALIN Video Outcome


|
| Fig Footages |
Comments
Post a Comment