Task 3: Type Exploration and Application
Applying the knowledge and experienced we gained from al the
exercises and tasks, we are going to create a complete typeface in
this task.
We were given three directions before starting our design:
1. Create a font that is intended to solve a larger problem or
meant to be part of a solution in the are of your interest be it
graphic design, animation, new media or entertainment design or
any other related area.
2. Explore the use of an existing letterform in an area of
interest and understand its relationship. Identify the parts that
could be improved upon, explore further solutions or combinations
that may enhance the existing letterform.
3. Experimental type. The idea to qualify as an experiment it
must be unique—material that might be 3-dimensional, digitally augmented,
edible, unusual, typographic music video or fine art.
1. Ideation and Research
Fig 1.1. Project Proposal, Week 9 (25.10.2023)
I will straightly go for experimental type because I prefer to use
my hand rather than use my brain, and I will probably have a lot of
fun with it. The first idea comes up to my mind is using water. I
searched for some other experimental examples on YouTube but
it doesn't seems to have any interesting or appropriate
results.
My second idea is using fingerprint to create a font. Mr. Vinod said
there's no point if I repeat what others do, so I decided to use my
whole finger to print out instead of just printing my thumb.
The
last idea is using clothes to form out letters, however this idea is
abandoned because I prefer the second one.
2. Exploration
#1
I first painted my index finger with nail polish, then stamped it on
paper. After choosing the usable fingerprint, I uploaded it to Adobe
Photoshop to get a grayscale fingerprint with transparent background.
Then I piece them together to form the letters in Adobe
Illustrator.

|
|
Fig 2.1. Exploration #1 , Week 11 (8.11.2023)
|
Due to I was using the entire finger, the fingerprint turned out to be
unusually long. I tried to address this issue by piecing together the
shapes of letters in a triangular manner, for example the letter C and D
in Fig 2.1.
However, the result turns out to be unsatisfactory. It is because the
fingerprint chosen doesn't represents a fingerprint's
characteristics, such as the vein lines, and also the unusual shape of
the fingerprint due to the force and position I stamped it. Mr.
Vinod advices me to do more research first. I also feel that I have
been confined within certain mental limitations.
#2
I looked for some good examples, but my options were constrained to using only my thumbprint, as
using the entire finger was proved impractical.
Fig 2.2. Visual Reference, Week 11 (8.11.2023)
I like the way the designer showcases the font, especially the one on
the right with its force control.
After the feedback section, I changed the ink material to
a stamp pad. It ensures an even application of force when
imprinting my fingerprints. Unlike nail polish, it doesn't leave
behind residue or create a thick layer that obscures the texture of
the fingerprint.
A. Uppercase
After careful consideration and consultation, I have decided to focus
on creating uppercase letters and numbers as much as possible.
Lowercase letters will not be within my scope, as they require smaller
fingerprints, while shrinking my fingerprints to achieve this effect
would compromise the consistency of the font.
**Circled fingerprint will be chosen for type exploration

|
|
Fig 2.2.1. Fingerprint Tryout - A, V, Week 12
(15.11.2023)
|
I am using the same fingerprint for some of the letter such as A and V, B
and D etc., because they shared the same reverted shape.

|
Fig 2.2.2. Fingerprint Tryout - B, E, Week 12
(15.11.2023)
|
|
I stamped my whole thumb on the paper, then crop out the top part to form
C, D and U. Then I piece them together upside down to form O. |
| Fig 2.2.3. Fingerprint Tryout - C, D, U and O, Week 12 (15.11.2023) |
|

|
|
Fig 2.4. Final Font Presentation - Uppercases and Numerals, Week 12 (15.11.2023)
|
3. Font Presentation
Requirements:
1. 4/5 artworks
2. 1024 x 1024px, 300ppi
After finishing the typeface, we were requested to create 4-5
artworks for font presentation.
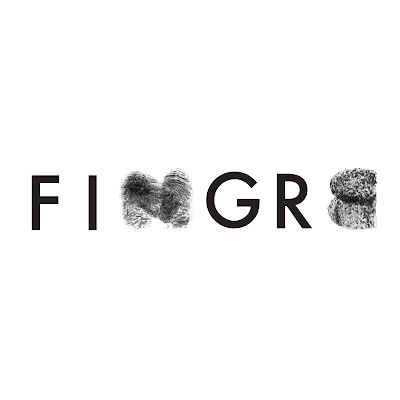
I named my typeface as "Fingre". My first idea is to showcase the font
name with the font, however it doesn't have F, I, G and R in it so I
replaced them with an existing font (Futura).
Instead of following the examples given, I tend to create my own kind
of presentation because I don't have a complete letters and
punctuations. Then, I did various attempts in
Adobe Illustrator.

|
|
Fig 3.1. Font Presentation Attempts, Week 13 (21.11.2023)
|
Final Font Presentation
|
|
Fig 3.2. Font Presentation #1, Week 13 (21.11.2023)
|

|
|
Fig 3.3. Font Presentation #2, Week 13 (21.11.2023)
|

|
|
Fig 3.4. Font Presentation #3, Week 13 (21.11.2023)
|

|
|
Fig 3.5. Font Presentation #4, Week 13 (21.11.2023)
|

|
|
Fig 3.6. Font Presentation #5, Week 13 (21.11.2023)
|
4. Font Application
I was struggling with the purpose of my typeface. I haven't got a
specific reason to create this experimental type, I find myself unsure
where to apply the font.
After a long time of consideration, I decided to create a concept of a
CD store for this font. It is because whenever I felt stressful while
developing this typeface, I always listen to music or watch a movie to
release stress.
I planned to apply the presentation artworks to collaterals, after some
minor editing.

|
Fig 4.1. Font Application Progress, Week 13 (21.11.2023)
|
Final Font Application

|
|
Fig 4.2. Final Font Application #1, Week 13
(21.11.2023)
|

|
|
Fig 4.3. Final Font Application #2, Week 13
(21.11.2023)
|

|
|
Fig 4.4. Final Font Application #3, Week 13
(21.11.2023)
|

|
|
Fig 4.5. Final Font Application #4, Week 13 (21.11.2023)
|
Final Task 3: Type Exploration and Application

|
|
Fig 5.1. Final Type Exploration, Week 13 (28.11.2023)
|

|
|
Fig 5.2. Final Type Presentation #1, Week 13
(28.11.2023)
|

|
|
Fig 5.3. Final Type Presentation #2, Week 13
(28.11.2023)
|

|
|
Fig 5.4. Final Type Presentation #3, Week 13
(28.11.2023)
|

|
|
Fig 5.5. Final Type Presentation #4, Week 13
(28.11.2023)
|

|
|
Fig 5.6. Final Type Presentation #5, Week 13
(28.11.2023)
|

|
|
Fig 5.7. Final Type Application #1, Week 13
(28.11.2023)
|

|
|
Fig 5.8. Final Type Application #2, Week 13
(28.11.2023)
|

|
|
Fig 5.9. Final Type Application #3, Week 13
(28.11.2023)
|

|
|
Fig 5.10. Final Type Application #4, Week 13
(28.11.2023)
|
Fig 5.11. Final Task 3: Type Exploration and Application - PDF, Week 13 (28.11.2023)
FEEDBACK
Week 9
General Feedback: Don't create a existed typeface.
Specific Feedback: Using the whole finger makes the idea
interesting, try working on it and see how it works.
Week 10
General Feedback: Be clear about the purpose of your font design.
Specific Feedback: Use a stamp pad instead of nail polish. Do research first.
Week 11
General Feedback: -
Specific Feedback: Keep on working with it.
Week 12
working in progress
Week 13
General Feedback: -
Specific Feedback: You may not follow the example given to create your font presentation as it is experimental.
I was actually struggling with the concept of my typeface. Unlike
other methods that has an aim, experimental type has no aim to be
created. All I do is just playing with the stamp pad and create
something that I think is nice. But overall I did really enjoy the process of either failure or successes. Creating this experimental type was like going on a fascinating adventure. From scripting the proposal to spending lots of time working on it, every single steps helped me to get better on what I do.
Observations
As I worked on my experimental type, I observed the importance of the practical side of each letter. I noticed how tiny changes could make big difference, which helped me had a better understanding of how design choices can really contributes visual appearance.
Findings
Through this journey, I found out that trial and error can also be a way of designing. Trying out new ideas and seeing what worked and what didn't taught me unexpected lessons. Embracing this trial-and-error approach not only shaped the best to my type, and also forced me to think out of the box to get better idea.
FURTHER READING
 |
| Fig 6.1. Letterforms : Typeface Design From Past to Future by Timothy Samara |
Stroke formed by two part: the body and the terminal.
The stroke in typography defines the shape of a character through lines with specific gestural movements, forming a unique combination. Factors like tool used, thickness, angle and pressure contribute to a visual impact of each stroke.
A stroke can be consistent in its weight or modulated.
Stroke formation can be continuous or interrupted.
The Counter
The negative space around and between strokes, called the counters, are crucial for defining a character's proportion, density and rhythm. It balanced the dark and light, the openness or compression of character and facilitate efficient reading by its stroke arrangement.
Recap: Parts of Letter


Comments
Post a Comment